Q & A of vue[1].
# Basics
# What is VueJS?
Vue.js is an open-source, progressive Javascript framework for building user interfaces that aim to be incrementally adoptable. The core library of VueJS is focused on the view layer only, and is easy to pick up and integrate with other libraries or existing projects.
# What are the major features of VueJS?
- Virtual DOM: It uses virtual DOM similar to other existing frameworks such as ReactJS, Ember etc. Virtual DOM is a light-weight in-memory tree representation of the original HTML DOM and updated without affecting the original DOM.
- Components: Used to create reusable custom elements in VueJS applications.
- Templates: VueJS provides HTML based templates that bind the DOM with the Vue instance data
- Routing: Navigation between pages is achieved through vue-router
- Light weight: VueJS is light weight library compared to other frameworks.
# What are the lifecycle methods of VueJS?
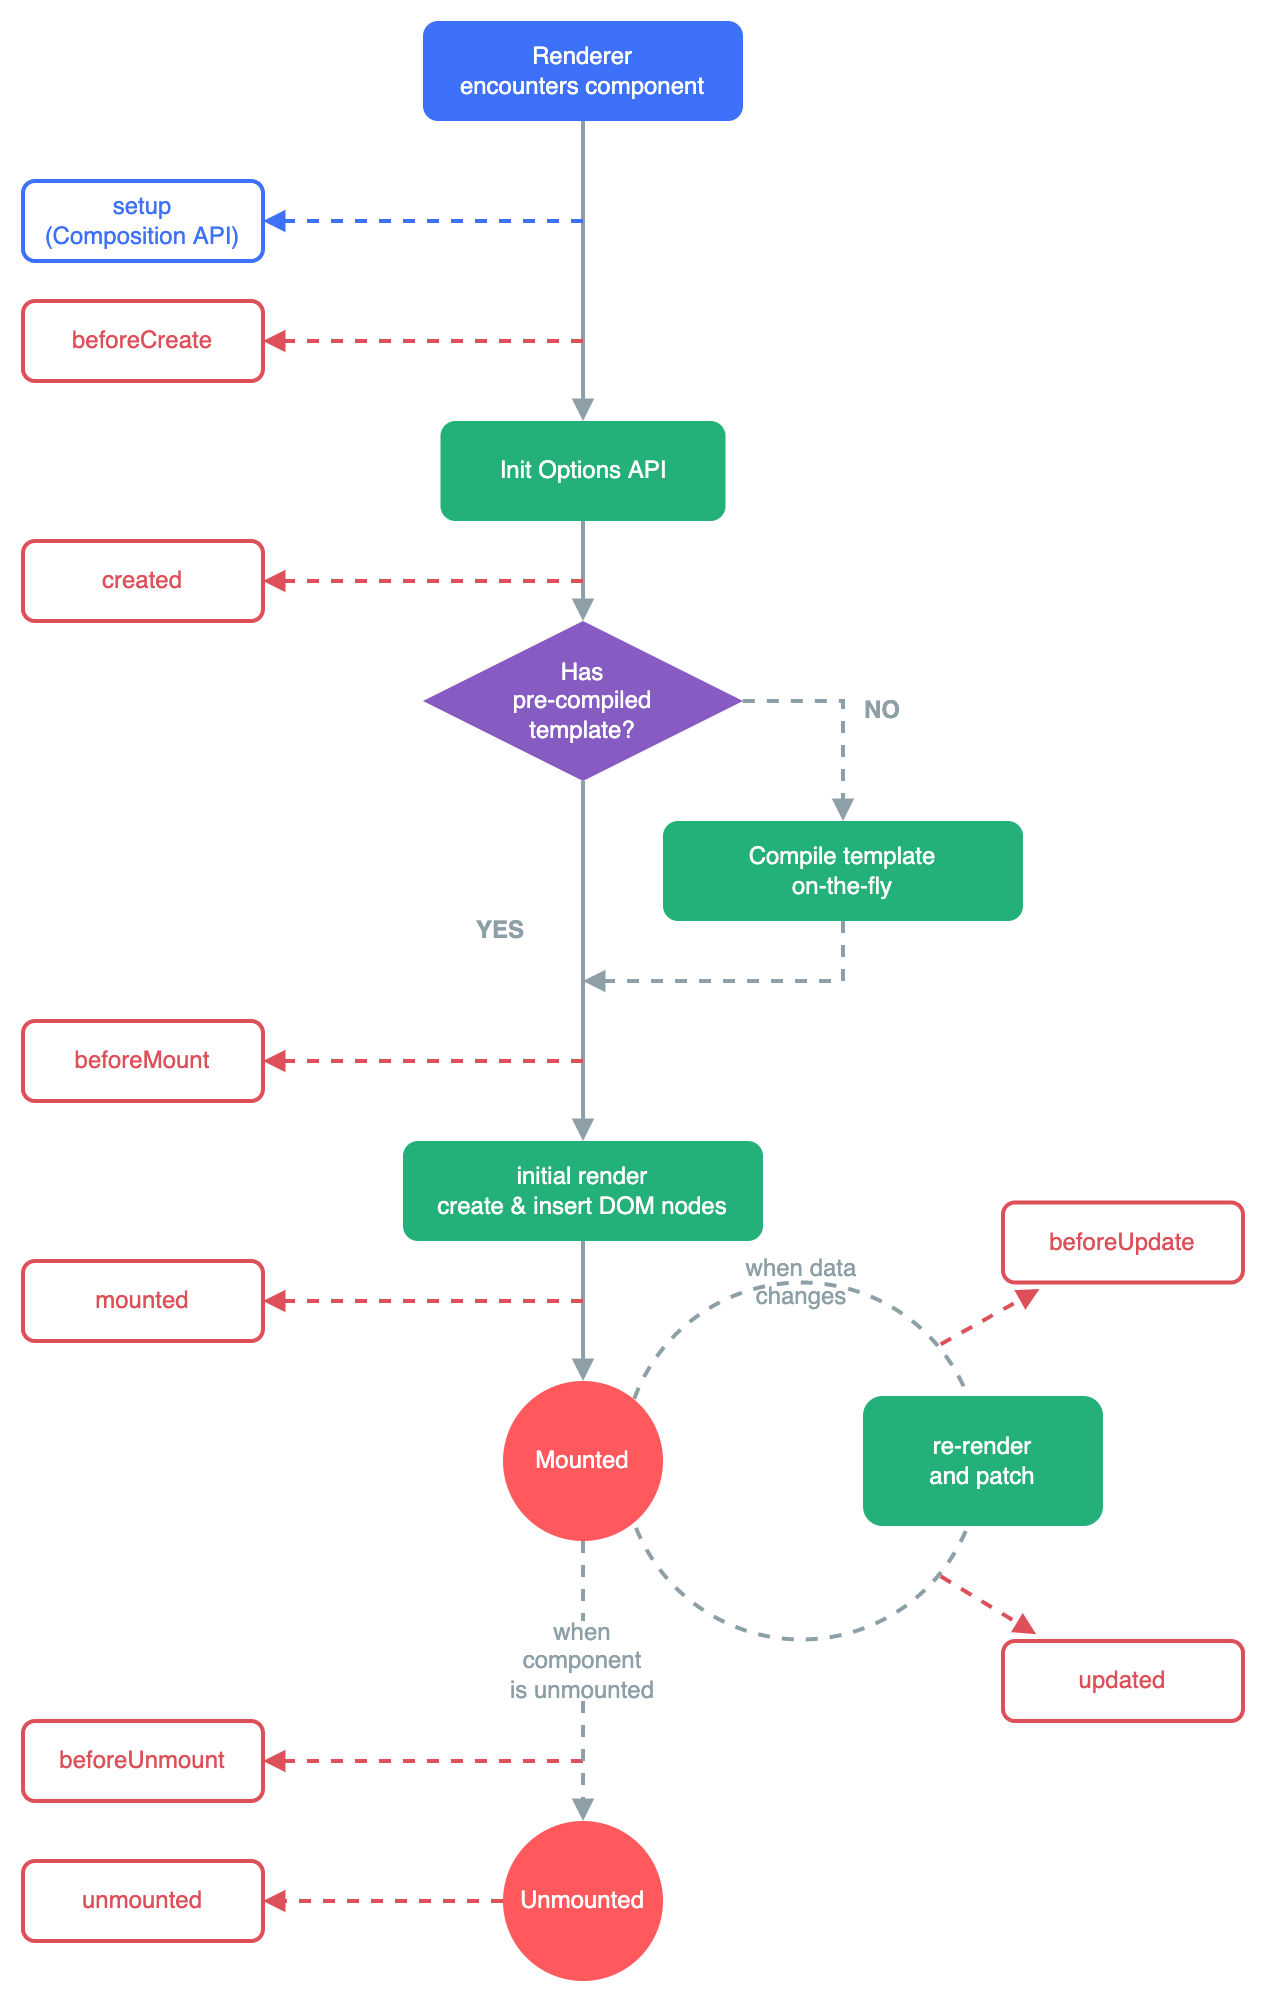
Lifecycle hooks are a window into how the library you’re using works behind-the-scenes. By using these hooks, you will know when your component is created, added to the DOM, updated, or destroyed. Let’s look at lifecycle diagram before going to each lifecycle hook in detail,
- Creation(Initialization):
Creation Hooks allow you to perform actions before your component has even been added to the DOM. You need to use these hooks if you need to set things up in your component both during client rendering and server rendering. Unlike other hooks, creation hooks are also run during server-side rendering.- beforeCreate:
This hook runs at the very initialization of your component. hook observes data and initialization events in your component. Here, data is still not reactive and events that occur during the component’s lifecycle have not been set up yet.
1
2
3
4
5
6
7
8
9
10
11
new Vue({
data: {
count: 10
},
beforeCreate: function () {
console.log('Nothing gets called at this moment')
// `this` points to the view model instance
console.log('count is ' + this.count);
}
})
// count is undefined- created:
This hook is invoked when Vue has set up events and data observation. Here, events are active and access to reactive data is enabled though templates have not yet been mounted or rendered.
Note: Remember that, You will not have access to the DOM or the target mounting element (this.$el) inside of creation hooks1
2
3
4
5
6
7
8
9
10new Vue({
data: {
count: 10
},
created: function () {
// `this` points to the view model instance
console.log('count is: ' + this.count)
}
})
// count is: 10 - beforeCreate:
- Mounting(DOM Insertion):
Mounting hooks are often the most-used hooks and they allow you to access your component immediately before and after the first render.- beforeMount:
The beforeMount allows you to access your component immediately before and after the first render.
1
2
3
4
5
6new Vue({
beforeMount: function () {
// `this` points to the view model instance
console.log(`this.$el is yet to be created`);
}
})- mounted:
This is a most used hook and you will have full access to the reactive component, templates, and rendered DOM (via. this.$el). The most frequently used patterns are fetching data for your component.
1
2
3
4
5
6
7
8
9<div id="app">
<p>I’m text inside the component.</p>
</div>
new Vue({
el: ‘#app’,
mounted: function() {
console.log(this.$el.textContent); // I'm text inside the component.
}
}) - beforeMount:
- Updating (Diff & Re-render):
Updating hooks are called whenever a reactive property used by your component changes, or something else causes it to re-render- beforeUpdate:
The beforeUpdate hook runs after data changes on your component and the update cycle begins, right before the DOM is patched and re-rendered.
1
2
3
4
5
6
7
8
9
10
11
12
13
14
15
16
17
18
19
20
21<div id="app">
<p>{{counter}}</p>
</div>
...// rest of the code
new Vue({
el: '#app',
data() {
return {
counter: 0
}
},
created: function() {
setInterval(() => {
this.counter++
}, 1000)
},
beforeUpdate: function() {
console.log(this.counter) // Logs the counter value every second, before the DOM updates.
}
})- updated:
This hook runs after data changes on your component and the DOM re-renders.
1
2
3
4
5
6
7
8
9
10
11
12
13
14
15
16
17
18
19
20<div id="app">
<p ref="dom">{{counter}}</p>
</div>
...//
new Vue({
el: '#app',
data() {
return {
counter: 0
}
},
created: function() {
setInterval(() => {
this.counter++
}, 1000)
},
updated: function() {
console.log(+this.$refs['dom'].textContent === this.counter) // Logs true every second
}
}) - beforeUpdate:
- Destruction (Teardown):
Destruction hooks allow you to perform actions when your component is destroyed, such as cleanup or analytics sending.- beforeDestroy:
beforeDestroyis fired right before teardown. If you need to cleanup events or reactive subscriptions, beforeDestroy would probably be the time to do it. Your component will still be fully present and functional.
1
2
3
4
5
6
7
8
9
10
11
12new Vue ({
data() {
return {
message: 'Welcome VueJS developers'
}
},
beforeDestroy: function() {
this.message = null
delete this.message
}
})- destroyed:
This hooks is called after your component has been destroyed, its directives have been unbound and its event listeners have been removed.
1
2
3
4
5
new Vue ({
destroyed: function() {
console.log(this) // Nothing to show here
}
}) - beforeDestroy:
# What are the conditional directives?
VueJS provides set of directives to show or hide elements based on conditions. The available directives are: v-if, v-else, v-else-if and v-show
- v-if: The v-if directive adds or removes DOM elements based on the given expression. For example, the below button will not show if isLoggedIn is set to false.
1 | |
You can also control multiple elements with a single v-if statement by wrapping all the elements in a element with the condition. For example, you can have both label and button together conditionally applied,
1 | |
- v-else: This directive is used to display content only when the expression adjacent v-if resolves to false. This is similar to else block in any programming language to display alternative content and it is preceded by v-if or v-else-if block. You don’t need to pass any value to this. For example, v-else is used to display LogIn button if isLoggedIn is set to false(not logged in).
1 | |
- v-else-if: This directive is used when we need more than two options to be checked. For example, we want to display some text instead of LogIn button when ifLoginDisabled property is set to true. This can be achieved through v-else statement.
1 | |
- v-show: This directive is similar to v-if but it renders all elements to the DOM and then uses the CSS display property to show/hide elements. This directive is recommended if the elements are switched on and off frequently.
1 | |
# What is the difference between v-show and v-if directives?
- v-if only renders the element to the DOM if the expression passes whereas v-show renders all elements to the DOM and then uses the CSS display property to show/hide elements based on expression.
- v-if supports v-else and v-else-if directives whereas v-show doesn’t support else directives.
- v-if has higher toggle costs while v-show has higher initial render costs. i.e, v-show has a performance advantage if the elements are switched on and off frequently, while the v-if has the advantage when it comes to initial render time.
- v-if supports
<template>tab but v-show doesn’t support.
# What is the purpose of v-for directive?
The built-in v-for directive allows us to loop through items in an array or object. You can iterate on each element in the array or object.
Array usage:
1 | |
You can also use of as the delimiter instead of in, similar to javascript iterators.
Object usage:
1 | |